Monthly Archives

September 2013

Posted on September 30, 2013

How to have perfect eyebrows

brows/ eyebrows/ Eyes/ How To

how to have perfect eyebrows

Today, Bellefbeauty.com has another tutorial for you, and of course it would have to be about eyebrows, because anyone who knows me would know that I’m eyebrow crazy, to me,  it’s probably one of the fastest (and easiest) ways to Enhance What’s Yours (not to mention how perfect eyebrows just lift your face!)

 So how can you have perfect eyebrows? It’s really simple, and as you can see, you really don’t need that many tools (so if you dare to leave your house without your eyebrows done, this is perfect for when you’re on the go!)

Without further ado, here are the steps for having perfect eyebrows:

eyeBROW-SHAPED-PERFECTLY

  1. Pluck out any unwanted hair – it will only get in the way!
  2. Comb out your eyebrows
  3.  Using an eyebrow pencil, outline your eyebrows to the shape that you want it to have.
  4.  Use an eyebrow powder that complements you (avoid using black alone even if you have dark hair)
  5. Fill in your brows using a brow brush
  6. Get a concealer
  7. Conceal above and below your brow using a concealer brush to perfect your brows and ensure that they are perfectly shaped
  8. Add a highlighter under your arch
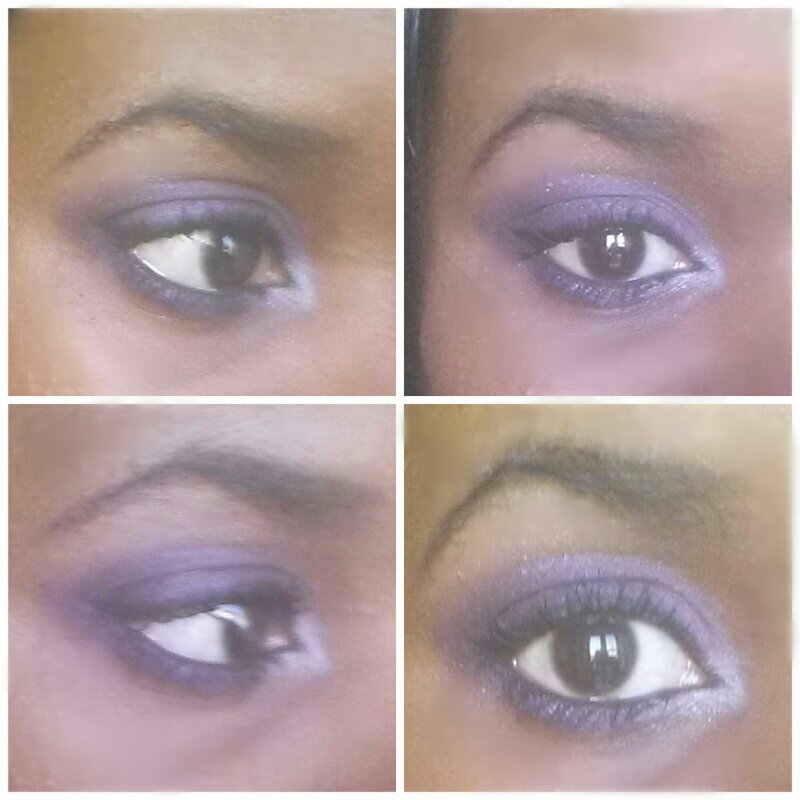
  9. Voila! The complete look with some mascara!

Note: If you have stubborn brows, finish up with eyebrow gel- this will set your eyebrows and make sure your hairs are not flying around the place!

I know these eye brows are no Cara Delevingne (it wouldn’t be right to talk about eye brows and not give her a mention!) but you have to remember not everyone can have the same eyebrow shape.

If you’re unsure of what shape your eyebrows should have, check out my first post on perfect eyebrows.

Are you big into brows like myself, if so then how do you normally do your brows? 

Don’t forget to subscribe to Enhance What’s Yours 

Twitter   Facebook   Instagram

how to have perfect eyebrows

Posted on September 27, 2013

5 Benefits of Coconut Water

Not so guilty pleasure

coconut water

It’s been a while since I wrote a ‘Guilty Pleasure’ post, never mind a ‘Not So Guilty Pleasure’ so I decided that it was time for me to get around to paying a bit more attention to the nutritional side of things (especially after my new found love  for coconut water)

If you follow my posts on Facebook or Twitter you would know that I am now addicted to coconut water (there’s worse things out there….)

After the Dublin Fashion Festival, where I met the beautiful Darren Kennedy pictured somewhere on the right, I was just hooked on Vita Coco coconut water and then of course I was introduced to KOH Coconut water which is even tastier that Vita Coco‘s (not to mention the difference in price)

The point is, enhancewhatsyours.com loves coconut water and here are 5 benefits of coconut water that we put together to help you Enhance Whats Yours:

coconut water

1. Anti-aging: The antioxidants in coconut water slow down the aging process because it helps fight free radicals (can’t go wrong!)

2. Weight- loss: Coconut water is low in fat, calories and sugars and rich in vitamins and nutrients so it can help you feel full pretty quickly. This will help suppress the feeling of hunger

Note:don’t use it as a replacement for food, it’s just something to keep you going until you have a real meal

3. Glowing Skin: Coconut water is considered to be one of the purest ones (after water that is) – it’s great for hydrating the skin and making your skin look more youthful and supple. Some say that coconut water has positive effects when dabbed on the skin but I’d feel pretty guilty for doing that so I guess that’s something I’ll never know……

4. Vitamins and Nutrients: Coconut water is a natural source of nutrients as it  contains  calcium, iron, magnesium, phosphorus, potassium (”more potassium than a banana”), zinc, Vitamin C and Vitamins of B so if you aren’t feeling the best, drink some coconut water and you’ll surly be energized!

5. Flushes toxins out: Coconut water is very beneficial for your digestive system, it helps remove toxins from your body and also provides hydration which will relieve you from any tiredness or fatigue (again a great energy boost!)

Honestly I just like the taste of coconut water, the fact that it has all these benefits (as well as beauty benefits) is just a bonus for me….

Have you tried coconut water yet? If so what do you make of it? Feel free to leave your thoughts below!

Don’t forget to subscribe to Enhance What’s Yours 

Twitter   Facebook   Instagram

coconutwa


Posted on September 20, 2013

Purple Smokey Eye Tutorial

Eyes/ How To/ tutorial

    smokey eyes

You have no idea how much hassle I had to go through to finally get this post up, from drafts magically disappearing to WordPress not allowing me to access my site! But the important thing is,I’m here now right?

So first things first, among many other goodies I got at The Ultimate Girls Day Out, the Rimmel Traffic Stopping Shadow was one of them so today  Bellefbeauty is finally going to show you a purple smokey eye tutorial with the Rimmel Traffic Stopping Shadow palette

smokey eyes steps

As you can see the colors look quite pigmented here, but I found that it wasn’t the case when they were applied onto my eyes (not impressed) , especially since I couldn’t wait to use the darkest shade of purple!

The palette also contains a little eye shadow applicator (I normally wouldn’t go near these for a smokey eye look because they key to getting a really strong smokey look is blend blend blend!)

To my surprise this worked out quite nicely here and I only actually used one other brush to achieve the smokey look below, so enough with the chit chat and check out the steps Bellefbeauty followed:

smokey eyes  smokey eye

Step 1: After applying an eye primer, start with the lightest shade of purple all over your eye lid as a base (if it’s not perfect, don’t worry because it’s only going to be blended anyways!)

Step 2: I know you can’t see it very clearly here but for this step I used the darkest purple on the crease and outer corner of the eyes to the shape that I wanted my smokey eyes to have (again, doesn’t have to be perfect just make sure its right below the brow bone this way we’ll have room to blend upwards!)

Step 3:  Apply the lightest shade of purple to the bottom lash line .

Step 4: Use a blending brush to blend the colors on the outer corner of your eyes in an upwards direction first and the slowly build your way to the center. Then using the same brush blend the colors on your bottom lash line.

Step 5: Once you’re happy with the smokey effect you can add eye liner on your lower lash line and upper lash line (I did both and added a bit of a flick)

Step 6: One this is done, add a good few coats of mascara (when it comes to smokey eyes, the bigger your lashes  the better!) of course you can add false lashes if you want them to be more dramatic, but I’m not a fan of them so I just like to stick to really good mascara, (I used lash domination here)

Step 7: Add some highlighter to each tear duct so that your eyes will pop out (in a good way) and also put some highlighter on your brow bone so the arch of your eyebrow will appear higher (oh la la….)

And there you go, 7 easy-steps to achieve this purple smokey eye look!

smokey eyessmokey eyes

I hope you’ve found this  smokey eye tutorial useful, feel free to leave your comments below!

Don’t forget to subscribe to Enhance What’s Yours to get more tutorials

straight to your phone!

Twitter   Facebook   Instagram

smokey eyes

Posted on September 14, 2013

Rihanna’s RIRI Hearts MAC Fall Collection 2013

Events

rihanna-mac-fall-preview

I figured Bellefbeauty might as well give her piece on Rihanna’s RIRI Hearts MAC Fall Collection 2013 since there’s only a few weeks left before we can all get our hands on this highly talked about makeup line. Well that’s of course if we start queuing up now…..

After the launch and success of RIRI Hearts MAC Summer 2013 Collection, the singer/designer (don’t know what to call these artists lately!)  decided to step up her game and launch an even bigger line that is due to release in US stores on Sept 26th and between Oct 3rd – 31st everywhere else (that’s if it will stay on the shelves for that long!)

So what’s there to like about Rihanna’s RIRI Hearts MAC Fall Collection?

For starters, if you missed out on the Matte red Riri Woo the first time around, consider yourself lucky because not only will it be back in the fall collection as a gorgeous lippie, Riri Woo will also be in a lip pencil AND  a lipglass! (doesn’t it feel like Christmas?)

As well as those fabulous shades of red, Rihanna’s RIRI Hearts MAC Fall Collection will also include three other fabulous lipsticks: Talk that Talk [Dark Plum (Retro Matte)], Who’s That Chick [Mid-tone Orange (Frost)] and Nude [Cool Nude Cream (Matte)] as pictured below.

riri mac fall collection

As you know, Bellefbeauty is very welcoming to new lippies. I love my matte lipsticks  (as well as my nudes) so the lipsticks from Rihanna’s RIRI Hearts MAC Fall Collection are definitely the products that I think are worth lining up for! As for everything else?

I think I’m doing just fine with my LASH DOMINATION mascara from BareMinerals, not to mention my eye shadow palette from Fuschia and I’m really not feeling the gold/pink packaging either! I probably would if you told me this was from Nicki Minaj’s makeup line, but Rihanna and pink just don’t go! (Green would have suited her a lot better I’d say!)

What do you all think of Rihanna’s RIRI Hearts MAC Fall Collection for this mega beauty brand? Are we excited or is it just another few products by MAC?

Hope you’ve subscribed to Enhance What’s Yours 

Twitter   Facebook   Instagram

Here is the COMPLETE RIRI Hearts MAC Fall Collection 2013 for your viewing pleasure……

rihanna-hearts-mac-fall-2013 rihanna-hearts-mac-fall-2013 rihanna-hearts-mac-fall-2013 rihanna-hearts-mac-fall-2013rihanna-hearts-mac-fall-2013rihanna-hearts-mac-fall-2013rihanna-hearts-mac-fall-2013rihanna-hearts-mac-fall-2013rihanna-hearts-mac-fall-2013                             rihanna-hearts-mac-fall-2013

riri mac fall collectionIf you want prices on each of these,

find out here

Posted on September 12, 2013

Pearlys Smile Box (Teeth Whitening Kit)

Beauty/ product review

pearlys smile box

I think it’s about time for me to give you my feedback on Pearlys Smile Box! Worth 60 euros, this teeth whitening kit was kindly sent to Bellefbeauty to review and ever since I used the Pearlys Teeth Whitening Powder I just couldn’t wait to get writing! (But that’s as far as excited I got, so prepare yourself ladies/gentlemen….)

So first things first, what’s in Pearlys Smile Box and how do you use it?

1. Pearlys Weekly Teeth-Brighten Powder
2. Pearlys Daily  Teeth-Whitening Foam
3. Pearlys Teeth Whitening Pen

As you can see, Pearlys Smile Box comes with 3 different products so with these 3 products (and 3 simple guidelines) you can be sure to have brighter teeth in no time!

So now for the steps…….

pearlys smile box

Step 1: Dampen your toothbrush and dip it into Pearlys Weekly Teeth-Brighten Powder. Brush your teeth as you normally would and do so for 2-4 mins (just listen to your favorite song and the time will fly!) This powder contains sodium bicarbonate and green tea that help polish your teeth to make it super-clean and super-shiny! (That’s what we’re aiming for right?)

Step 2:  Add a layer of Pearlys Teeth-Whitening Foam to your regular toothpaste and scrub a dub dub for another 2-4 mins! This foam contains 0.16% of sodium perborate, a substance that breaks down into oxygen and water, (the oxygen lifts the staining from inside the enamel, so you’ll be shining from the inside out!)

Step 3: Twist the whitening pen until you see a clear gel. Apply a thin layer to your teeth and avoid  getting the product directly onto your gums or lips for at least 60 seconds (close to impossible for me!)  After 10mins you can rinse your mouth and then avoid food/drink for another 30mins (Again,  not happening!)

pearlys smile box

So if you have  a little more time in your hands in the morning than most people, then Pearlys Teeth Whitening Pen should not be a huge problem for you. In general I found this quite odd to use (not to mention the fact that you have to avoid getting the product on your gums/lips, beyond awkward!!)

The teeth-whitening foam in Pearlys Smile Box didn’t really add much to my teeth whitening experience (except for the fact that there was a leak when I received it in the post)  so I think I’ll be giving that a pass as well!

Other than that I must admit that the brightening powder really does work wonders, it’s so refreshing and my teeth definitely felt brighter after a single use! Unfortunately you can only use it twice a week so that’s a bummer, but I guess it just makes you look forward to using it the following week! (I know I’m such a nerd!)

So what’s my final verdict, would I purchase Pearlys Smile Box Kit?

This kit was a miss for me! I think I could live without Pearlys Smile Box Kit to be quite honest, I would however purchase Pearlys Teeth-Brighten Powder which cost £15,00 online. Given how little you use of the powder, it would probably last a good few months, especially since the one I have still looks like I’ve never used it!

Have you used any home-whitening kits? If so, which ones?

Hope you’ve subscribed to Enhance What’s Yours 

Twitter   Facebook   Instagram


Posted on September 9, 2013

BareMinerals Get Started Kit

Beauty/ product review

bareminerals get started kit

Before I tell you about how much fun I had at the Dublin Fashion Festival, I think it’s fair to tell you a bit about Bellefbeauty‘s visit to BareMinerals and my a mini lesson on using the BareMinerals Get Started Kit (56-58 euros). Anyone who knows me personally would know that I am against drag makeup ,instead, I always strive for the most natural look possible. So if you’re anything like me (and even if you do enjoy the occasional drag makeup) you will find that this kit is still perfect for an everyday ”no makeup” look.

For those of you who are cosmetically challenged, worry not, because the BareMinerals Get Started Kit has everything you need, from the right brushes, to a ‘Get Started Guide Book’ that will truly help you master their signature Swirl, Tap, Buff makeup technique (which I’m very happy to have mastered myself)

bareMinerals GET STARTED kit

So what’s in the Get Started Kit and how do I use it?

  •  After cleansing and moisturizing your face, you can start off with the Prime Time Foundation Primer (As you know I’m quite liking Benefit’s POREfessional primer at the moment, so I will definitely have to do a comparison post to see which primer I prefer)
  • When that is all set and done, use your Full Flawless Face Brush to apply the  BareMinerals SPF foundation that you choose from 20 different shades and 3 different formulas (original, matte or ready formula) but of course if you pop into BareMinerals they can help you decide on what’s the best formula for your skin type!

1.SWIRL a small amount of BareMinerals in the lid with the brush until it’s all tucked into the bristles. 2.TAP away any excess. There should be no visible bareMinerals on the outside of the brush. 3.BUFF bareMinerals onto the skin in a circular motion all over the face, concentrating on your forehead, cheeks, nose and chin.

  • Follow these instructions until you’re happy with the coverage you have built. If there are still some areas you would like to conceal, apply the Swirl, Tap, Buff technique but use the Max Concealer Cover Brush instead and apply to desired areas.
  • After that you can use the smaller Flawless Face Brush and apply the same Swirl, Tap, Buff technique to use the Warmth All-Over Face Color. Apply it in a 3 motion starting from the side of your forehead to under  your cheekbones and then backwards from the cheekbone to your jawline. This should add color to your face and give you a healthy sun-kissed glow.
  • Lastly, use your Full Flawless Face Brush to apply the Mineral Veil over your face in a circular motion. This will further absorb any oil and will keep your complexion fresh.

bareMinerals Gert started kit

The BareMinerals Get Started Kit is about all you need for a natural and healthy everyday look! After the lovely staff in BareMinerals were finished with me I felt so much more fresh and alive! Especially after they used LASH DOMINATION (which you all know I love!) 

What impressed me the most about the BareMinerals Get Started Kit is that you really only need a tiny bit of product followed by the Swirl, Tap, Buff technique to easily build the coverage you’re looking for. That aside, the Mineral veil that you apply at the very end to keep everything in place actually prevents the makeup from smudging (I witnessed it myself!!) so you no longer have to worry about wearing that pretty white blouse you’ve been dying to wear!

Have you picked up your BareMinerals Get Started Kit yet? If so, what are your favorite products so far, if not, what are you waiting for??? 🙂

Hope you’ve subscribed to Enhance What’s Yours Remember, Swirl, Tap and Buff ladies! 

Twitter   Facebook   Instagram

Posted on September 5, 2013

The Ultimate Girls Day Out Dublin 2013

Events

The Ultimate Girls Day Out

I should probably start by saying that it has been an eventful few days for Bellefbeauty (with more to come of course!) so for my next few posts I will be sharing with you the events that I attended this week, as well as the occasional banter of a few treats that I picked up along the way (has to be done!…..) So hope you’re ready for me to share my thoughts on The Ultimate Girls Day Out…….

The Ultimate Girls Day Out is the first fashion/beauty event show where Bellefbeauty made an appearance. Held at the RDS from 30th Aug – 1st Sept, The Ultimate Girls Day Out was a very promising event.We were all given the chance to browse through designer boutiques, get pampered with free beauty treatments and on top of all that, get discounted makeup products! (it doesn’t get any better than that!)

In case you didn’t know, I’m a bit eyebrow crazy, so I was delighted to get my hands on an eyebrow palette from Threads for less than half price! And If you love Bourjois (which I’m sure a lot of you do) then you would have been over the moon to see what kind of discounts they had over at their stand! I got these 5 lovely products for only 10 bobs!

The Ultimate girls day out

Now back to the Event…..

The Ultimate Girls Day Out is not only a fun day out, but it can also be a very educational one. From great beauty tips at the beauty zone to inspirational masterclasses at the smart girls zone,The Ultimate Girls Day out has something for every girl so whether you’re a fashion addict, beauty junkie, or book nerd, The Ultimate Girls Day Out can tailor to your needs!

If you’re an aspiring model, then The Ultimate Girls Day Out would have been perfect for you  to enter the Model Search competition and be named the face of Davey Davey hair salon!

Also, I think it’s fair to add that host Lorraine Keane did a wonderful job at introducing the models for the catwalk shows (yes there were catwalk shows!) not to mention her shoes/dress, which looked absolutely amazing!!

Now  if you didn’t attend The Ultimate Girls Day Out, don’t be too hard on yourself, it will be on again next year. Also, after I subscribed to U magazine I was given a nice little goodie bag with some lovely vouchers inside (we all love discounts!) and because I can be a little giving at times (I’m sure you know where I’m going with this ….) I’m giving you the chance to get your hands on the voucher of your choice!

the ultimate girls day out

All you have to do it like my Facebook page and follow me on Twitter! Whoever is the most engaging on each page gets their first pick at one of these lovely vouchers!

So if you’d like 20% off a beautiful dress from iClothing, 10% off beauty products at TheBeautyLounge or HerClutterBox, amazing discounts at House of Colour OR 10% off your next Threads treatment, then get liking/following!*

Did you attend The Ultimate Girls Day Out in Dublin this year, feel free to leave your thoughts below, would love to hear about your experience!

Hope you’ve subscribed to Enhance What’s Yours blog 🙂

Twitter   Facebook   Instagram

the ultimate girls day out

*House of Color and Threads offer are both flyers. All the others are vouchers with a code that can be used online

Posted on September 2, 2013

D.I.Y Honey & Lemon Face Mask

D.I.Y/ Natural beauty

honey & lemon face mask

I noticed that I got  a good bit of feedback from my first D.I.Y post on how to make a lip scrub, so I thought that it would be a good idea to do another quick D.I.Y post for you, so if you’re looking to lighten, tighten and brighten your face, keep reading and you will soon find that this honey & lemon face mask is the answer to your beauty prayers!

What you need:

Raw honey & Organic lemon juice (just a fancy way of saying squeeze the juice out of real lemons rather than getting ready made lemon juice!)

Why raw honey?

Honey is a natural antibacterial and anti-inflammatory so by using raw/organic honey in your face mask, you will benefit from all the nutrients that usually die due to excessive heat and pasteurization in non-organic honey.

It also absorbs impurities from the pores and the skin (No wonder ancient beauties used it with milk to keep their complexion looking young and radiant!)

And why would you ever want to put lemon on your face!!??

Here’s why…..

Lemon, lightens, tightens and brightens!!! Now to get more technical…. because of the lightening properties in lemon it is good for uneven skin tone. Not to mention that it’s good for exfoliating (important for any face mask!)

Now down to the nitty gritty…

Squeeze 1/2 a lemon into a bowl, add 2 tbsp of honey (organic/raw). Mix it with a spoon until it’s a liquid consistency. Apply it all over a clean face avoiding eye area.Leave on for 15-20 mins and rinse off. And it’s that simple!

Have you ever tried a honey and lemon face mask? 

Feel free to leave your comments below!

P.S. Don’t forget to subscribe to this blog to be in a chance to take part of my free giveaway! 

Twitter   Facebook   Instagram

Back to top
%d bloggers like this: