Browsing Tag

Highlighter

Posted on June 26, 2014

Highlighting and contouring

Beauty

Highlighting attracts and contouring detracts

Those are the cardinal rules to highlighting and contouring, something that anybody who has even the slightest interest in makeup should know so if you’re going to know anything about makeup, let it be this….

Do you ever wonder how Tyra Banks has a nose that looks so perfectly narrow, or how Kim K has those perfectly shaped cheekbones? Well believe you me, it’s not all natural and let me assure you that this look can be achieved by everyone and anyone with this simple little ‘trick’ called highlighting and contouring.

So what exactly is highlighting and contouring??
It’s all about bringing dimension and glow to the face! With the highlighting you bring out your features and draw attention to certain areas while the contouring does the opposite by diminishes other areas, almost like a shadow effect.
So what do you need:
1. Highlighters – Mac prep + prime highlighter is great (just under 30E)
 2.Contours – E.L.F Contouring Blush & Bronzer (cheap and cheerful! $3)
 3.Foundation –  the usual (it should match your skin tone)
4.Setting powder – optional
Note:
Always moisturize your face before applying any make up! You don’t want your face to appear dry….
how to highlight and contour

Kim K revealed…..

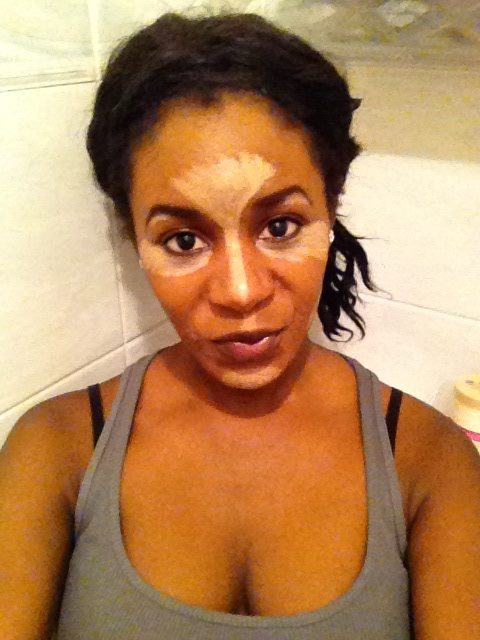
-Now that you know what you need, first start with applying the highlighter in the V area of your forehead, down your nose, under the eyes, cheekbones, on your brow line and chin as pictured above.
-Using a shade much darker than usual, contour under the cheekbones, on the temple, near the hair line, your jawline and contour the sides of the nose as well to make it appear thinner.
Note: if you look a bit scary after this, you’re on the right track!
-Now with a foundation that matches your skin tone blend everything in with a large brush and the lines should fade away gradually, eventually you see dimension just  blend blend blend!
If you use a setting powder, apply lightly to the face but generally, after this 3 step process you should have a beautifully defined , sculpted, yet NATURAL look!
This process takes the longest in my makeup application so if you spend over an hour on your face and you’re NOT highlighting and contouring, then I really don’t know what you’re doing!
What takes you the longest to complete in your makeup application process?
Feel free leave comments and share!
Thanks for reading yet another long post! Hope you’ve enjoyed it!

Twitter  Facebook   Instagram

How-to-highlight-and-contour-

bye now!

Posted on October 9, 2013

How to make your lipstick last longer

How To/ lips

mac rebel

 If you are one of those people who have to constantly worry about retouching your lips, search no further because on enhancewhatsyours.com you’ll find the top tips for having your lipstick last longer so the last thing you have to think about on a night out is constantly doing retouches on your lips (can be pretty annoying!)

So here’s how to make your lipstick last longer:

Prep your lips:

1. Exfoliate: I can’t stress how important lip exfoliation is for your lips, as you might have saw in my D.I.Y lip scrub, regular exfoliation replaces old cells with new cells which is a great way to keep your lips soft and subtle.

Note: If you’re preparing for a night out you can give your lips a gentle scrub with your toothbrush for a quick/fresh exfoliation

2. Lip balm: Before lipstick comes lip balm, let it settle on your lips to keep them moistened and prevent them from cracking. If there is any excess balm make sure you blot it off.

The nitty gritty:

inglot lip pencil 857

1.Lip liner: Line your lips starting from the cupids bow and then fill them in with the liner. This will lay a foundation for your lipstick. Here I’m using a lip liner by Inglot which I love because it’s highly pigmented and also has a lip brush at the other end. (It’s so good, I sometimes use it as a lipstick on it’s own!)

how to make lipstick last longer inglot 857  how to make lipstick last longer inglot 857

2. Lipstick: For the best results, apply your lipstick with a lipstick brush, as it allows the color to really get into the lip and stay on longer. Get a tissue and blot your lips a couple of times to press the color into your lips. After this, go for a second coat of lipstick.

I will be using Rebel by MAC it’s another one of my favorites. And as you can see, the two colors are quite similar so it’s just perfect because the lip liner won’t take away from the lipstick’s true color!

how to make lipstick last longer inglot 857

3. Concealer: As we do to get perfect eyebrows, use concealer to tidy up around the lips and give them a clean edge.

how to make lipstick last longer inglot 857

Note: I also like to use the highlighter from my Gosh BB Skin Perfecting Kit and apply it to my cupids bow, this will give you and effortless pout!

And that’s that, 5 simple steps to have your lipstick last longer! How do you normally apply your lipstick?

Don’t forget to subscribe to Enhance What’s Yours 

Twitter     Facebook     Instagram

<p style="text-align: center;">Hope you'll make use of this quick lesson, feel free to leave comments below!</p> <p style="text-align: center;"><a href="http://www.mylivesignature.com" target="_blank"><img style="border: 0 !important; background: transparent;" alt="" src="http://signatures.mylivesignature.com/86097/filomenakaguako/9f54854a5887b4af51db8b12f9f32f75.png" border="0" /></a></p> <p style="text-align: center;"><strong>Don't forget to subscribe to <a href="http://enhancewhatsyours.com/about/">Enhance What's Yours</a> </strong></p> <p style="text-align: center;"><strong></strong><a href="http://twitter.com/FilomenaKaguako">Twitter</a>     <a href="http://facebook.com/FilomenaKaguako">Facebook</a>     <a href="http://instagram.com/bellefbeauty">Instagram</a></p> <p style="text-align: center;"></p>

Posted on September 30, 2013

How to have perfect eyebrows

brows/ eyebrows/ Eyes/ How To

how to have perfect eyebrows

Today, Bellefbeauty.com has another tutorial for you, and of course it would have to be about eyebrows, because anyone who knows me would know that I’m eyebrow crazy, to me,  it’s probably one of the fastest (and easiest) ways to Enhance What’s Yours (not to mention how perfect eyebrows just lift your face!)

 So how can you have perfect eyebrows? It’s really simple, and as you can see, you really don’t need that many tools (so if you dare to leave your house without your eyebrows done, this is perfect for when you’re on the go!)

Without further ado, here are the steps for having perfect eyebrows:

eyeBROW-SHAPED-PERFECTLY

  1. Pluck out any unwanted hair – it will only get in the way!
  2. Comb out your eyebrows
  3.  Using an eyebrow pencil, outline your eyebrows to the shape that you want it to have.
  4.  Use an eyebrow powder that complements you (avoid using black alone even if you have dark hair)
  5. Fill in your brows using a brow brush
  6. Get a concealer
  7. Conceal above and below your brow using a concealer brush to perfect your brows and ensure that they are perfectly shaped
  8. Add a highlighter under your arch
  9. Voila! The complete look with some mascara!

Note: If you have stubborn brows, finish up with eyebrow gel- this will set your eyebrows and make sure your hairs are not flying around the place!

I know these eye brows are no Cara Delevingne (it wouldn’t be right to talk about eye brows and not give her a mention!) but you have to remember not everyone can have the same eyebrow shape.

If you’re unsure of what shape your eyebrows should have, check out my first post on perfect eyebrows.

Are you big into brows like myself, if so then how do you normally do your brows? 

Don’t forget to subscribe to Enhance What’s Yours 

Twitter   Facebook   Instagram

how to have perfect eyebrows

Posted on August 21, 2013

Gosh BB Skin Perfecting Kit

product review

gosh bb skin perfecting kit

If you’ve read my post on highlighting and contouring, you would know that I love the overall look achieved after sculpting and defining the face. So when I came across the Gosh BB Skin perfecting kit, it should be no surprise to you that I felt instantly drawn to it (with reason!)

At only 10.99, the Gosh BB Skin perfecting kit comes in two different shades: Light and Medium (as pictured above) The kit contains two concealers and one shimmering highlighter (which is fabulous)

How to use the Gosh BB skin perfecting kit:

1. Using your finger tips or a concealer brush, apply the lightest color concealer right under your eyes if you want to brighten up dark circles.

2. To cover up any other imperfections, mix the shades until you get the closest match to your skin tone.

3. And for my favorite step, use the highlighter under your brows and above your cheekbones for a fabulous finish!

 Remember: If you use a powder foundation, conceal first, if you use a liquid foundation, conceal after!

Now for my honest opinion:

Because I’d use the Gosh BB skin perfecting kit for a day look, I’m not too pushed on the pasty concealers that would normally be suited for a night time look. The highlighter however is a very close match to my skin tone (with a bit of a sparkle) so I found it perfect for enhancing the shape of my eye brows and for giving me higher raised cheek bones.

Normally I would use MAC prep + prime highlighter, but again, I’d rather use that for a night time look so the Gosh BB skin perfecting kit really saved me from using my MAC highlighter on a daily basis.

Have you used the Gosh BB skin perfecting kit yet? If so feel free to leave your thoughts and feedback below!

P.S. Don’t forget to subscribe to this blog to be in a chance to take part of my free giveaway! 

If you want to read another witty article, check out my post on stiletto nails on the Starlit Jewellery blog!

Twitter   Facebook   Instagram

Posted on August 19, 2013

Why should I use a highlighter?

Beauty
MAC highlighter

Mac prep+prime bright forecast

Personally I think that highlighters are a ”must have”  for anyone who is looking for that flawless finish because with such little effort, the right highlighter can give you that dewy look that will have people thinking you’ve just finished moisturizing your face (gotta love the makeup tricks!) so it really does baffle me when people ask

Why should I use a highlighter?

When applied correctly, a highlighter will change your beauty look enormously, even to the extent that it will have people wondering why you have a sudden glow (or an extra glow)

So in order to achieve that dewy look with a highlighter, you need to remember that there are three main areas that you should highlight:

1. The cheekbones/temples: when applying a highlighter to your cheekbones, try to blend it to the highest point of your cheek bone and the up toward your temple.

2. Eyes: when applying a highlighter around the eye area, remember to blend it under your brow bone to give your eye brows a lift when contouring.If you apply some highlighter to the inner crease of your eyes, it will open your eyes.

How-to-highlight-and-contour-

MAC Prep+Prime (Bright forecast)

3. Cupid’s bow: Applying highlighter to the cupid’s bow and just beneath your bottom lip will not only give you a healthy pout, but it will also give your lipstick a multi-dimensional color effect.

I also like to put some highlighter on the V area between my brows and at the bridge of my nose so if you’re going to do this, avoid applying too much highlighter to the very tip of your nose as the finish look will appear shiny rather than contoured.

Precautions:

– You can apply your highlighter after your foundation, but before your concealer.

– Always match the texture of your highlighter to your base i.e for liquid/cream foundation, use a creamy highlighter

-If you use a powder highlighter, always apply a thin layer of translucent powder over your foundation first.

Remember: If you want a naturally glowing look, the highlighter should blend in well with the foundation!

mac highlighter

Mac prep + prime bright forecast

I am currently using a MAC Prep+Prime Highlighter Pen, if you’d like me to review this product, feel free to comment below.

P.S. Don’t forget to subscribe to this blog to be in a chance to take part of my free giveaway! 

Twitter   Facebook   Instagram

Back to top
%d bloggers like this: