Browsing Category

Beauty

Posted on August 23, 2013

Benefit: The POREfessional

Beauty/ product review

Benefit the POREfessional

Unfortunately for me (and any other person who has been cursed with sebum-prone skin), when it comes to maintaining a healthy look throughout the day, a little bit of extra care has to be taken into account. This can be particularly stressful on warm and summer days, so one of the ways to avoid a makeup meltdown (or any other type of meltdown) would be to use a face primer, or should I say Benefit: The POREfessional face primer. (34.50E)

Although it may seem a bit on the pricey end of things for such a small tube (22ml), the reason why I like the POREfessional face primer is because the product is highly concentrated, you really only need a pea size of it (maybe even less if you’re only applying it to your T-zone) so at the end of the day, you will get a good wear out of this product.

What Benefit say:

Quickly minimize the appearance of  pores with the POREfessional. apply this silky, lightweight formula to minimize the appearance of pores & fine lines for smoother-than-silk skin

What I say:

I think ”smoother-than-silk” is a bit of an oversell to be honest, nevertheless, the POREfessional really does do an amazing job at minimizing the appearance of pores (even without foundation!) So the fact that it can be worn before, after AND without any foundation at all is always a plus when you’re trying to keep it light during the summer!

Benefit POREfessional

  • Before foundation:The POREfessional creates a smooth and even canvas before you apply your foundation so it minimizes the appearance of pores and fine lines leaving you with a seamless finish.
  • After foundation:The POREfessional can be used during the day for a touch up in case your pores come out during hiding. (we don’t want that now do we!)
  • Without foundation:Because the POREfessional is quite mattifying, it is perfect for oil control (not to mention the Vitamin E derivative it contains which is known to protect skin from free radicals)

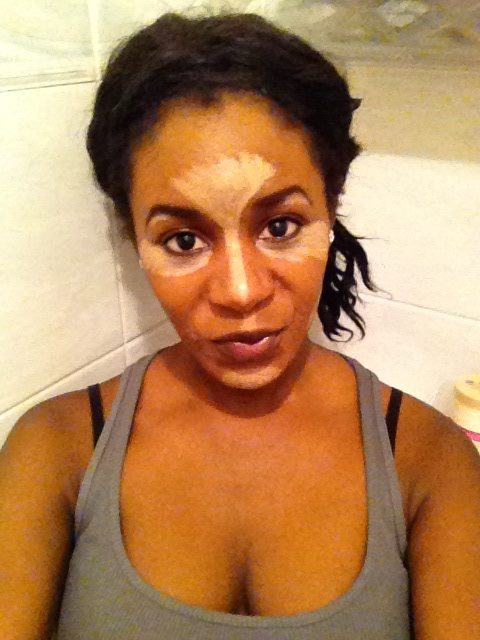
As you can see, the POREfessional has a bit of a beige color, but don’t be alarmed because after it is blended in it just leaves a smooth and mattifying finish.

Benefit POREfessional

There really is no reason why you shouldn’t at least give POREfessional a try….I know the name is a bit cheesy, but we’re all a bit guilty of being cheesy from time to time so get off your high horse and get shopping!

Have you tried Benefit’s POREfessional primer? if not, what are your favorite primers? 

P.S. Don’t forget to subscribe to this blog to be in a chance to take part of my free giveaway! 

Hope you’ve had a chance to read this weeks post on stiletto nails on the Starlit Jewellery blog…

Twitter   Facebook   Instagram

Posted on August 19, 2013

Why should I use a highlighter?

Beauty
MAC highlighter

Mac prep+prime bright forecast

Personally I think that highlighters are a ”must have”  for anyone who is looking for that flawless finish because with such little effort, the right highlighter can give you that dewy look that will have people thinking you’ve just finished moisturizing your face (gotta love the makeup tricks!) so it really does baffle me when people ask

Why should I use a highlighter?

When applied correctly, a highlighter will change your beauty look enormously, even to the extent that it will have people wondering why you have a sudden glow (or an extra glow)

So in order to achieve that dewy look with a highlighter, you need to remember that there are three main areas that you should highlight:

1. The cheekbones/temples: when applying a highlighter to your cheekbones, try to blend it to the highest point of your cheek bone and the up toward your temple.

2. Eyes: when applying a highlighter around the eye area, remember to blend it under your brow bone to give your eye brows a lift when contouring.If you apply some highlighter to the inner crease of your eyes, it will open your eyes.

How-to-highlight-and-contour-

MAC Prep+Prime (Bright forecast)

3. Cupid’s bow: Applying highlighter to the cupid’s bow and just beneath your bottom lip will not only give you a healthy pout, but it will also give your lipstick a multi-dimensional color effect.

I also like to put some highlighter on the V area between my brows and at the bridge of my nose so if you’re going to do this, avoid applying too much highlighter to the very tip of your nose as the finish look will appear shiny rather than contoured.

Precautions:

– You can apply your highlighter after your foundation, but before your concealer.

– Always match the texture of your highlighter to your base i.e for liquid/cream foundation, use a creamy highlighter

-If you use a powder highlighter, always apply a thin layer of translucent powder over your foundation first.

Remember: If you want a naturally glowing look, the highlighter should blend in well with the foundation!

mac highlighter

Mac prep + prime bright forecast

I am currently using a MAC Prep+Prime Highlighter Pen, if you’d like me to review this product, feel free to comment below.

P.S. Don’t forget to subscribe to this blog to be in a chance to take part of my free giveaway! 

Twitter   Facebook   Instagram

Posted on August 5, 2013

Makeup Tips: 5 Quick Beauty Fixes

Beauty

make up fixes

We’ve all been in a situation where we think we’re nearly finished with our makeup, then all of a sudden one of our cheeky lashes manages to make it’s way into our eyes…… not the best feeling in the world is it?

As much as it irritates me, I’ve managed to find a good trick to get rid of the little bugger without completely ruining my look! So I’m going to let you in on my little secret while sharing 5 quick beauty fixes with you so I hope these makeup tips will make your life that much easier!

1. When your mascara smudges before you go through the front door, consider yourself lucky because that could have gone unnoticed! For a quick beauty fix, just dip one end of your cotton bud into your moisturizer and gently remove the smudge from your face! Then use the other side of the cotton bud to get rid of any excess moisturizer.

2. If you’ve gone a bit heavy with the blusher, mix a bit of your moisturizer with your foundation (on the back of your hand) then lightly blend it onto your cheeks if you’ve used a cream blush, if not, lightly go over your cheeks with fixing powder (or translucent powder)

3. To prevent creamy eye shadow from creasing, lightly brush some translucent powder on your eyes after you’ve applied the cream shadow (this translucent powder really is a saving grace!)

4. If you want to prevent your eyeliner from smudging, apply the same-color eye shadow over the liner. Applying eye shadow on top on your liquid or gel liner will seal your eyeliner so that it will last longer without smudging, this is my favorite makeup tip!

and now for the one we’ve been waiting for…….

5. If your eye lash gets into your eye after you’ve applied your eye makeup, DO NOT panic!! Follow these simple guidelines:

-Wash and dry your hands so you can be sure that their clean.

-Open your eyes wide until you’ve spotted the lash.

-Once spotted, move the lash to the inner corner of your eye lid.

-Let the corner of a clean square of tissue slowly touch the lash and  if you do it right, you will witness some sort of magnet affect with the two!

This has always worked for me and because the tissue is thin so it isn’t too uncomfortable! just make sure you don’t use too much tissue, because if you do, that might get stuck in your eye and you will be left with two problems rather than one!

What are your quick beauty fixes and favorite makeup tips? Would love to get some feedback on what you find works/ doesn’t work for you so feel free to comment below! Thanks for reading 🙂

P.S. Don’t forget to subscribe to this blog to be in a chance to take part of my free giveaway!

Twitter   Facebook   Instagram

Related Posts

  • 37
    The first thing that springs to mind for a Valentine's Day look is the red lip: a defined and sultry red lip. But what comes after that? Not a lot of people get that far! When it comes to Valentines Day makeup, your look should be three things: subtle, but…
    Tags: eye, liner, makeup, foundation, tips, shadow, free, giveaway, corner, blusher
Posted on July 30, 2013

Bare Minerals Marvelous Moxie: First Finish

Appearance/ Beauty/ maintenance/ product review

bare minerals marvelous moxie finish first best nude lipstick

Those of you who know me would know that I tend to go through a series of phases. Ever since my matte phase started dying on me I slowly started building an obsession with something new (I guess it’s true what they say ‘the only way to get rid of one obsession is to find another’) and in this case, my new obsession is with nude lipstick.

Of course it started off with nude nails (first indication of obsession), but as always I managed to find a way to get my hands on a nude lipstick that really blew me away: Bare Minerals Marvelous Moxie: Finish First (19e)

This lippy really does glide on like a dream! So those of you who suffer from chapped lips will be more than happy to know that this product is very forgiving !

bare minerals marvelous moxie finish first best nude lipstick enhance whats yours belle f beauty

What I Iove:

1.This nude lipstick has a plumping effect so it gives you a nice and healthy pout (operating word being healthy)

2. It has a creamy texture it’s almost like putting butter on your lips!

3.It gives you a rich satin finish (you really  can’t go wrong)

4.It’s a nude lipstick that applies evenly

5. It’s long wearing so you don’t have to retouch too many times with this

6. It’s great for a day-time look and night-time look so you could get the best wear out of it

and last but not least……

It smells amazing!

If that isn’t enough for you to want one of your own, then I really don’t know what is! Even I have to admit that I’m glad they didn’t have the nude lipstick I was looking for in MAC the day I bought this, otherwise I would not have discovered this fabulous lippy at all.

Have you tried anything from the new Bare Minerals Marvelous Moxie Lip collection? If not, don’t you worry because you have loads to choose from! Bare Escentuals have recently released 20 new lippies, 10 liners, and 4 brand new Moxie lip glosses so I cannot wait to get my hands on more!

Nude lipstick: Are you a fan or a foe?

Bare minerals moxie lipstick finish first before and after

Twitter      Instagram    Facebook

 NOTE: I’m doing a giveaway after 100 subscribers, so remember to subscribe to this blog! Just type in your email on the top right of the side bar…. Thanks for reading 🙂


Posted on July 21, 2013

The Liebster award

Beauty

I was recently nominated for the Liebster award….excited, enthusiastic and anxious, I just couldn’t wait to see what that meant! of course being me I quickly discovered that I was getting a bit ahead of myself….

The Liebster award is a way for early stage bloggers to connect and get to know each other.  ‘Liebster’ which is German for ‘beloved’ means that being nominated for this award meant that I was favored by the beautiful closbeautyspot to answer a few questions about myself….

To keep this nice and short, I decided to make a video for the second part of this task so get reading!

Questions asked by Closbeautyspot:

1. Favorite beauty/hair product of all time? Apart from water, my matte red lipstick

2. Movies or books? Psychological thrillers all the way! 

3. What is your idea of a great day off? Not having to lift a finger all day

4. High end or high street makeup?  Assuming high street means pharmacy makeup…..high end makeup!

5. Favorite country? J’adore Paris

6. Glass half full or half empty? Half empty (but it’s something I’m working on!)

7. Why did you start bloggingI decided it was time for me to explore my deep rooted passion for beauty 

8. Favorite thing to eat or drink? Watch the video below to find out 🙂

9. Night in or night out? Depends where I am! 

10. What character would you be in Harry Potter & why? Harry Potter because he’s as complex as me!

We’re half way there everyone, here is a quick video on ’11 facts about me: IMG_0256 make sure you comment below on anything I’ve said in this video!

Now I’m going to tag 10 other bloggers on twitter and get them to give us 11 facts and answers to this:

1. What’s your favorite food?

2. Where did you celebrate your last birthday?

3.Favorite makeup brand? (why)

4. Least favorite makeup brand (why)

5. How long do you spend on your makeup?

6. What’s the longest part of your process?

7. Would you leave the house without makeup?

8. How often do you exercise?

9. Is there anything that annoys you about applying makeup, if so what?

10. Did you have a good weekend?

Hope you enjoyed my post and video! Make sure you check out closbeautyspot  she’s very stylish and creative (always a good mix!) and keep an eye out for my post on Summer essential this week!

facebooktwitterinstagram

Posted on April 10, 2013

The power of your eyebrows

Beauty/ eyebrows/ Natural beauty

brows

A lot of people tend to underestimate exactly what their eyebrows do for their face, why? I’ll never know!  But what I do know is that beautifully groomed eyebrows really do transform your face and brings out your natural beauty. So if something takes very little time and also makes a huge difference to your appearance, then why not invest in it?

Doing my eyebrows almost comes as a second nature to me and I genuinely can’t imagine myself ever leaving the house without my eyebrows done especially since it only takes about 5 mins! But I should probably ‘fess up in case it ever comes out in the near future; there was a time in my life where I would spent almost 40 mins doing my eyebrows alone, I’d use hair removal cream, tweezers, brow pencil,  brow shadow and the whole shebang!! But looking back at my old pictures now, I can honestly say that all my efforts didn’t really do me any justice!

Over the years I learnt that less is more and that the less time I spend on my eyebrows the higher the chances of them turning out to be a tad bit normal!

The picture above is basically a sketch of what an ideal brow should look like. The first line represents the start of the brow, and this should be aligned  with the inner corner of the eye and the side of your nostril. The second line is the arch and it really does break my heart to see so many people getting this all wrong!  The arch should always be two-thirds of the way across the brow so unless you dress up as a drag queen  from time to time, there really is no reason why you should have your arch anywhere else. Finally,the last line represents where the brow should end and as you can see it doesn’t extend past the corner of the eye.

It’s that simple!

I have seen some cases where  people barely have any brows due to over tweezing and other cases where the brows are too far a part. All that can be fixed by adding a few strokes of a light eyebrow pencil. I like to use a brow shadow with a brow brush on top of my pencil because personally I think it adds more definition to my brows but at the end of the day, it all comes down to personal preference. Lastly use a brow gel to keep all the hairs in place, if you have extra long hairs on your brows just use baby scissors to trim them off.

Now that I’ve gotten all that off my chest, let’s have a bit of a laugh! Here is a link I found  of a few celebrities without eyebrows:

http://celebritieswithouteyebrows.tumblr.com/

I hope you have now realized the power of your eyebrows


Twitter   Facebook   Instagram

Back to top
%d bloggers like this: