Browsing Tag

contouring

Posted on August 17, 2015

Review: W7 Cosmetics Ebony Range

Makeup/ product review

w7 cosmetics

If you follow me on Instagram, then you would know that I was recently sent a full range of makeup products from a brand called w7 cosmetics. Some of you may have come across w7 products in your local chemist, as they are widely known for having Naked palette dupes – gotta love a good duplicate!

W7 cosmetics has been in Ireland for the past three years. In such a short space of time, the budget-friendly brand is in over 400 stores nationwide and has over one hundred individual makeup products for eyes, lips, skin and more.

The products I’m going to be reviewing today are from their new Ebony range, which hasn’t officially been launched in Ireland. However, it is available to buy online from Amazon or Ebay.

Without further ado, let’s see what w7 cosmetics has for us dark skinned gals!

SHAPE & DEFINE €6.50

w7 ebony shape and define

These palettes are available in three different shades; light , medium and deep. Each palette comes with a compact mirror, and a short guide on how you can achieve that Kim K look:

Apply the sculpting powder to your cheeks. Then apply the highlighting powder above and below the cheekbones for a defined contoured look
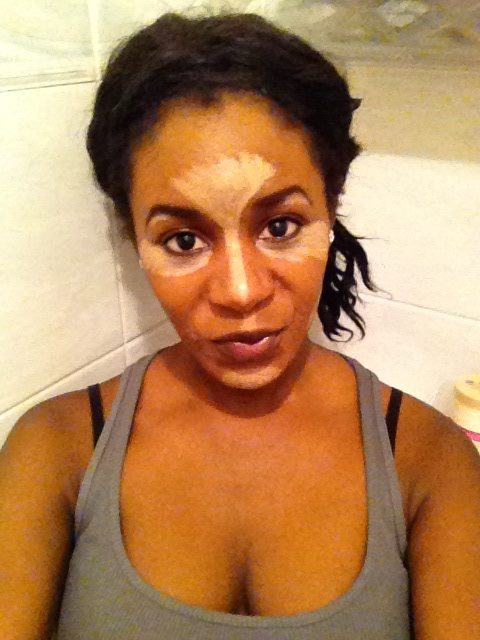
Light Shade

            w7 medium w7 light swatch

As much as I love the highlighter, as you can see, this contour shade isn’t right for me at all. It is far too light, and since highlighting and contouring is about creating shadows, the light palette would just defeat the purpose of it for me. I think this shade would suit somebody who has a fairer skin tone than myself.

Medium Shade

               w7 light     w7 medium swatch

The medium shade on the other hand, works a lot better with my skin tone. Out of the three, this was definitely my favourite. It gives my face just the definition it needs. With a few brush strokes, it doesn’t give a hugely obvious highlight and contour, making it perfect for day time wear.

Deep Shade

               w7 deep       w7 deep dark

Although the deeper shade looks ridiculously dark, I think it works really for nights out. Since it is quite pigmented, you don’t need to go to heavy with it at all. With the right techniques, this shade can give you that sculpted and defined look without looking like a drag!

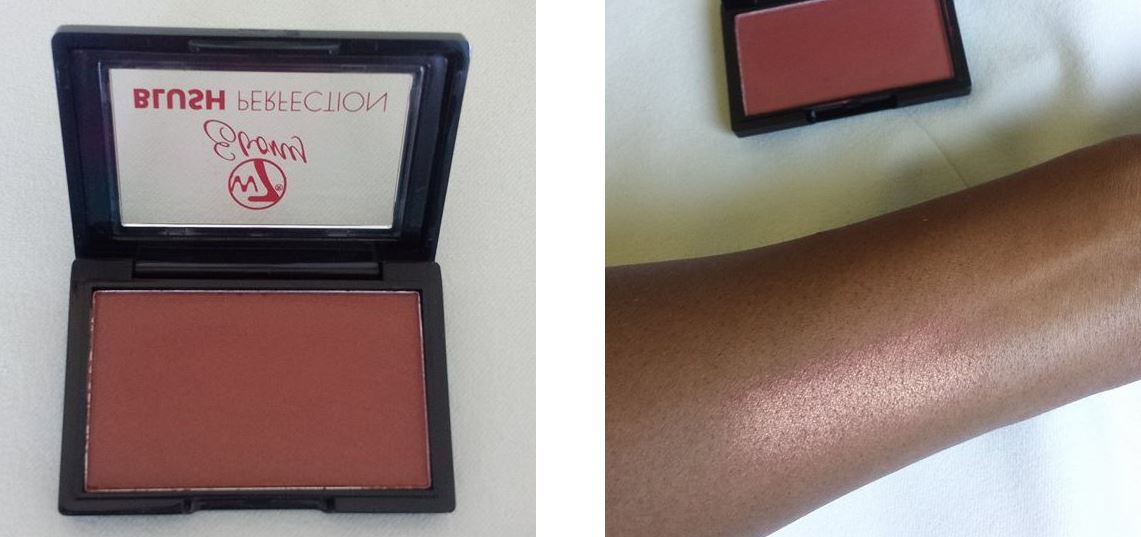
BLUSH PERFECTION €3.95

w7 blush perfection

These blushes are available in four different shades. Sand Dune, Pink Sands and Sea Shell have a matte finish, while Red Dawn has a bit of a shimmer in it.

Sand Dune

w7 blush sand dune

This shade is definitely too light for my skin tone, it has a bit of a coral hue to it. It would suit someone who has a fairer skin tone than me and wants to create that natural ‘no make up’ look.

Pink Sands

w7 blush pink

This shade has a pinkier hue. It is one of my favourites for day time makeup because it gives you a natural flush. With this shade, I can have people thinking ‘I woke up like this.’:)

Sea Shell

w7 blush 3

I quite liked this shade and I found that the colour and texture really works well with the shape and define palette. It is slightly darker than the other two, but doesn’t make your face look too heavy. It is very much suited for night wear.

Red Dawn

w7 shimmer

This ones for our sparkling divas. I don’t usually like shimmering blushers, but I was surprised by this one. It works well on the days I don’t have a highlight, but I still want to brighten up my face.

Overall, I was impressed by these w7 products as they were super easy to apply and they set really well on the face. I was very surprised by the quality of them and think they’re an absolute steal! It’s also worth mentioning that the packaging does not give the price away s it doesn’t look cheap at all. You would never guess by looking at them that they’re so affordable!

ME WEARING W7 COSMETICS

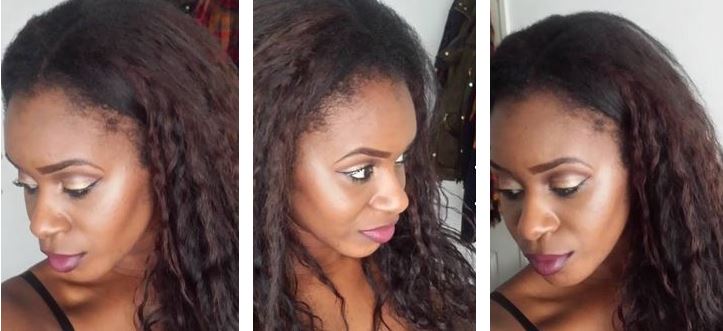
Here, I used the Shape & Define medium palette with Sea Shell blush and the tiniest bit of Red Dawn:

Other products in this range:

  • Trio Concealer €3.95
  • Lipsticks €3.95
  • Cream to powder foundation €4.95

Hope you enjoyed my write up, keep an eye on the blog for more reviews of other products from this range 🙂

Twitter   Facebook   Instagram

Related Posts

  • 10000
    I know I haven’t done a beauty product review in a while – since I got on the healthy lifestyle bandwagon I’ve been finding it hard to get off! So to kick things off, I’ve decided to share my thoughts on a brand which I have been using every day…
  • 10000
    If you’re a fan of The Body Shop, then you will be very happy to hear that their New Voyage collection will be on the shelves and ready to make their way to your comforting homes, by the end of this week – let the countdown begin! With best-selling products…
  • 10000
    For this review, I’m going to be looking at the MeMeMe products that were sent to me a few weeks back. If you are familiar with MeMeMe, then you've probably noticed the brand’s growing presence in Ireland. Years ago, MeMeMe products were always under stocked and generally not the easiest…
Posted on December 5, 2014

How to make your lips look fuller

How To/ lips/ Tips

ange

As much as I hate to admit it, we can’t all be Angelina’s.We can’t all be born with full lips and we can’t all have the courage – or money – to get fillers done. That’s just life!

But like most beauty-related dilemmas, there are ways around it. With the right tricks and techniques, you can make your lips look much fuller than they actually are – it’s all about perception!

Here are some of my suggestions for plumping up your pucker without getting any fillers. After these tips, you’ll be more than just a little ready for that kiss under the mistletoe 😉

Avoid the dark side

When it comes to making your pout appear fuller, lip colour matters. Avoid dark colours and shades, as they will only make your lips look smaller . Opt for lighter shades that are closer to your skin tone if you want to visually enlarge your lips.

Line it up

Use a lip liner close to the colour of your lips to draw around the natural line of your mouth. Try not to overdo it, because it will just look wrong altogether! When you’ve finish outlining, use the same pencil to fill in the lips. Smudge and rough lines before you apply your lippy/gloss.

Highlighting matters

Apply some highlighter right above your cupid’s bow and then use your finger to blend it in lightly. Then, use a brown liner beneath your lower lip line – the line shouldn’t be harsh at all. This highlighting and contouring trick will make your lips look like they are creating a shadow because they’re THAT much fuller!

A clever finish

If you want to give off the illusion of fullness, then it’s a good idea to avoid matte textures. They tend to diminish the actual size of your lips, while shiny finishes reflect light and make your lips look more luscious and full.

Pro tip: Use your toothbrush to exfoliate your lips every morning. This promotes blood circulation to the lips, which in turn will make them seem rosier and fuller. Added bonus? You get a temporary plump!

Twitter   Facebook   Instagram

Related Posts

  • 10000
    I don't think I stand alone when I say that there's nothing better than a good D.I.Y that takes no longer than a minute to put together! So for this weeks second post, I thought I'd show you all how to make a lip scrub at home! Why should you…
  • 10000
     If you are one of those people who have to constantly worry about retouching your lips, search no further because on enhancewhatsyours.com you'll find the top tips for having your lipstick last longer so the last thing you have to think about on a night out is constantly doing retouches…
  • 10000
    Dry lips have never been a huge problem for me growing up, I mean let's face it, what are the chances of someone with oily skin actually ending up with dry lips as well? Life isn't that bad! But, (there's always a but) I did go through a stage in my life where…
  • 52
    Anyone who knows me personally would know that I've never been a fan of heavy makeup. As much as I love a good dark lip for a night out, when it comes to my everyday look, I like to keep it as natural as possible. A few products to brighten…
    Tags: will, light, lips, dark, lip
  • 39
    When I think of makeup for Christmas or New Year’s Eve, the first thought that comes to mind is glitter: lots and lots of glitter. It’s glamorous, it’s feminine, but most of all, it stands out! If you’re along the same line of thought, then you will appreciate these tips.…
    Tags: will, lips, lip, highlighting
Posted on August 19, 2013

Why should I use a highlighter?

Beauty
MAC highlighter

Mac prep+prime bright forecast

Personally I think that highlighters are a ”must have”  for anyone who is looking for that flawless finish because with such little effort, the right highlighter can give you that dewy look that will have people thinking you’ve just finished moisturizing your face (gotta love the makeup tricks!) so it really does baffle me when people ask

Why should I use a highlighter?

When applied correctly, a highlighter will change your beauty look enormously, even to the extent that it will have people wondering why you have a sudden glow (or an extra glow)

So in order to achieve that dewy look with a highlighter, you need to remember that there are three main areas that you should highlight:

1. The cheekbones/temples: when applying a highlighter to your cheekbones, try to blend it to the highest point of your cheek bone and the up toward your temple.

2. Eyes: when applying a highlighter around the eye area, remember to blend it under your brow bone to give your eye brows a lift when contouring.If you apply some highlighter to the inner crease of your eyes, it will open your eyes.

How-to-highlight-and-contour-

MAC Prep+Prime (Bright forecast)

3. Cupid’s bow: Applying highlighter to the cupid’s bow and just beneath your bottom lip will not only give you a healthy pout, but it will also give your lipstick a multi-dimensional color effect.

I also like to put some highlighter on the V area between my brows and at the bridge of my nose so if you’re going to do this, avoid applying too much highlighter to the very tip of your nose as the finish look will appear shiny rather than contoured.

Precautions:

– You can apply your highlighter after your foundation, but before your concealer.

– Always match the texture of your highlighter to your base i.e for liquid/cream foundation, use a creamy highlighter

-If you use a powder highlighter, always apply a thin layer of translucent powder over your foundation first.

Remember: If you want a naturally glowing look, the highlighter should blend in well with the foundation!

mac highlighter

Mac prep + prime bright forecast

I am currently using a MAC Prep+Prime Highlighter Pen, if you’d like me to review this product, feel free to comment below.

P.S. Don’t forget to subscribe to this blog to be in a chance to take part of my free giveaway! 

Twitter   Facebook   Instagram

Back to top
%d bloggers like this: