Browsing Category

How To

Posted on October 2, 2013

How to clean your makeup brushes

How To/ maintenance

how to clean makeup brushes

There’s nothing worse than using dirty makeup brushes on your face, first of all it isn’t the most hygienic thing in the world, and secondly you are basically asking for your skin to be terribly irritated (not exactly the best way to Enhance What’s Yours...)

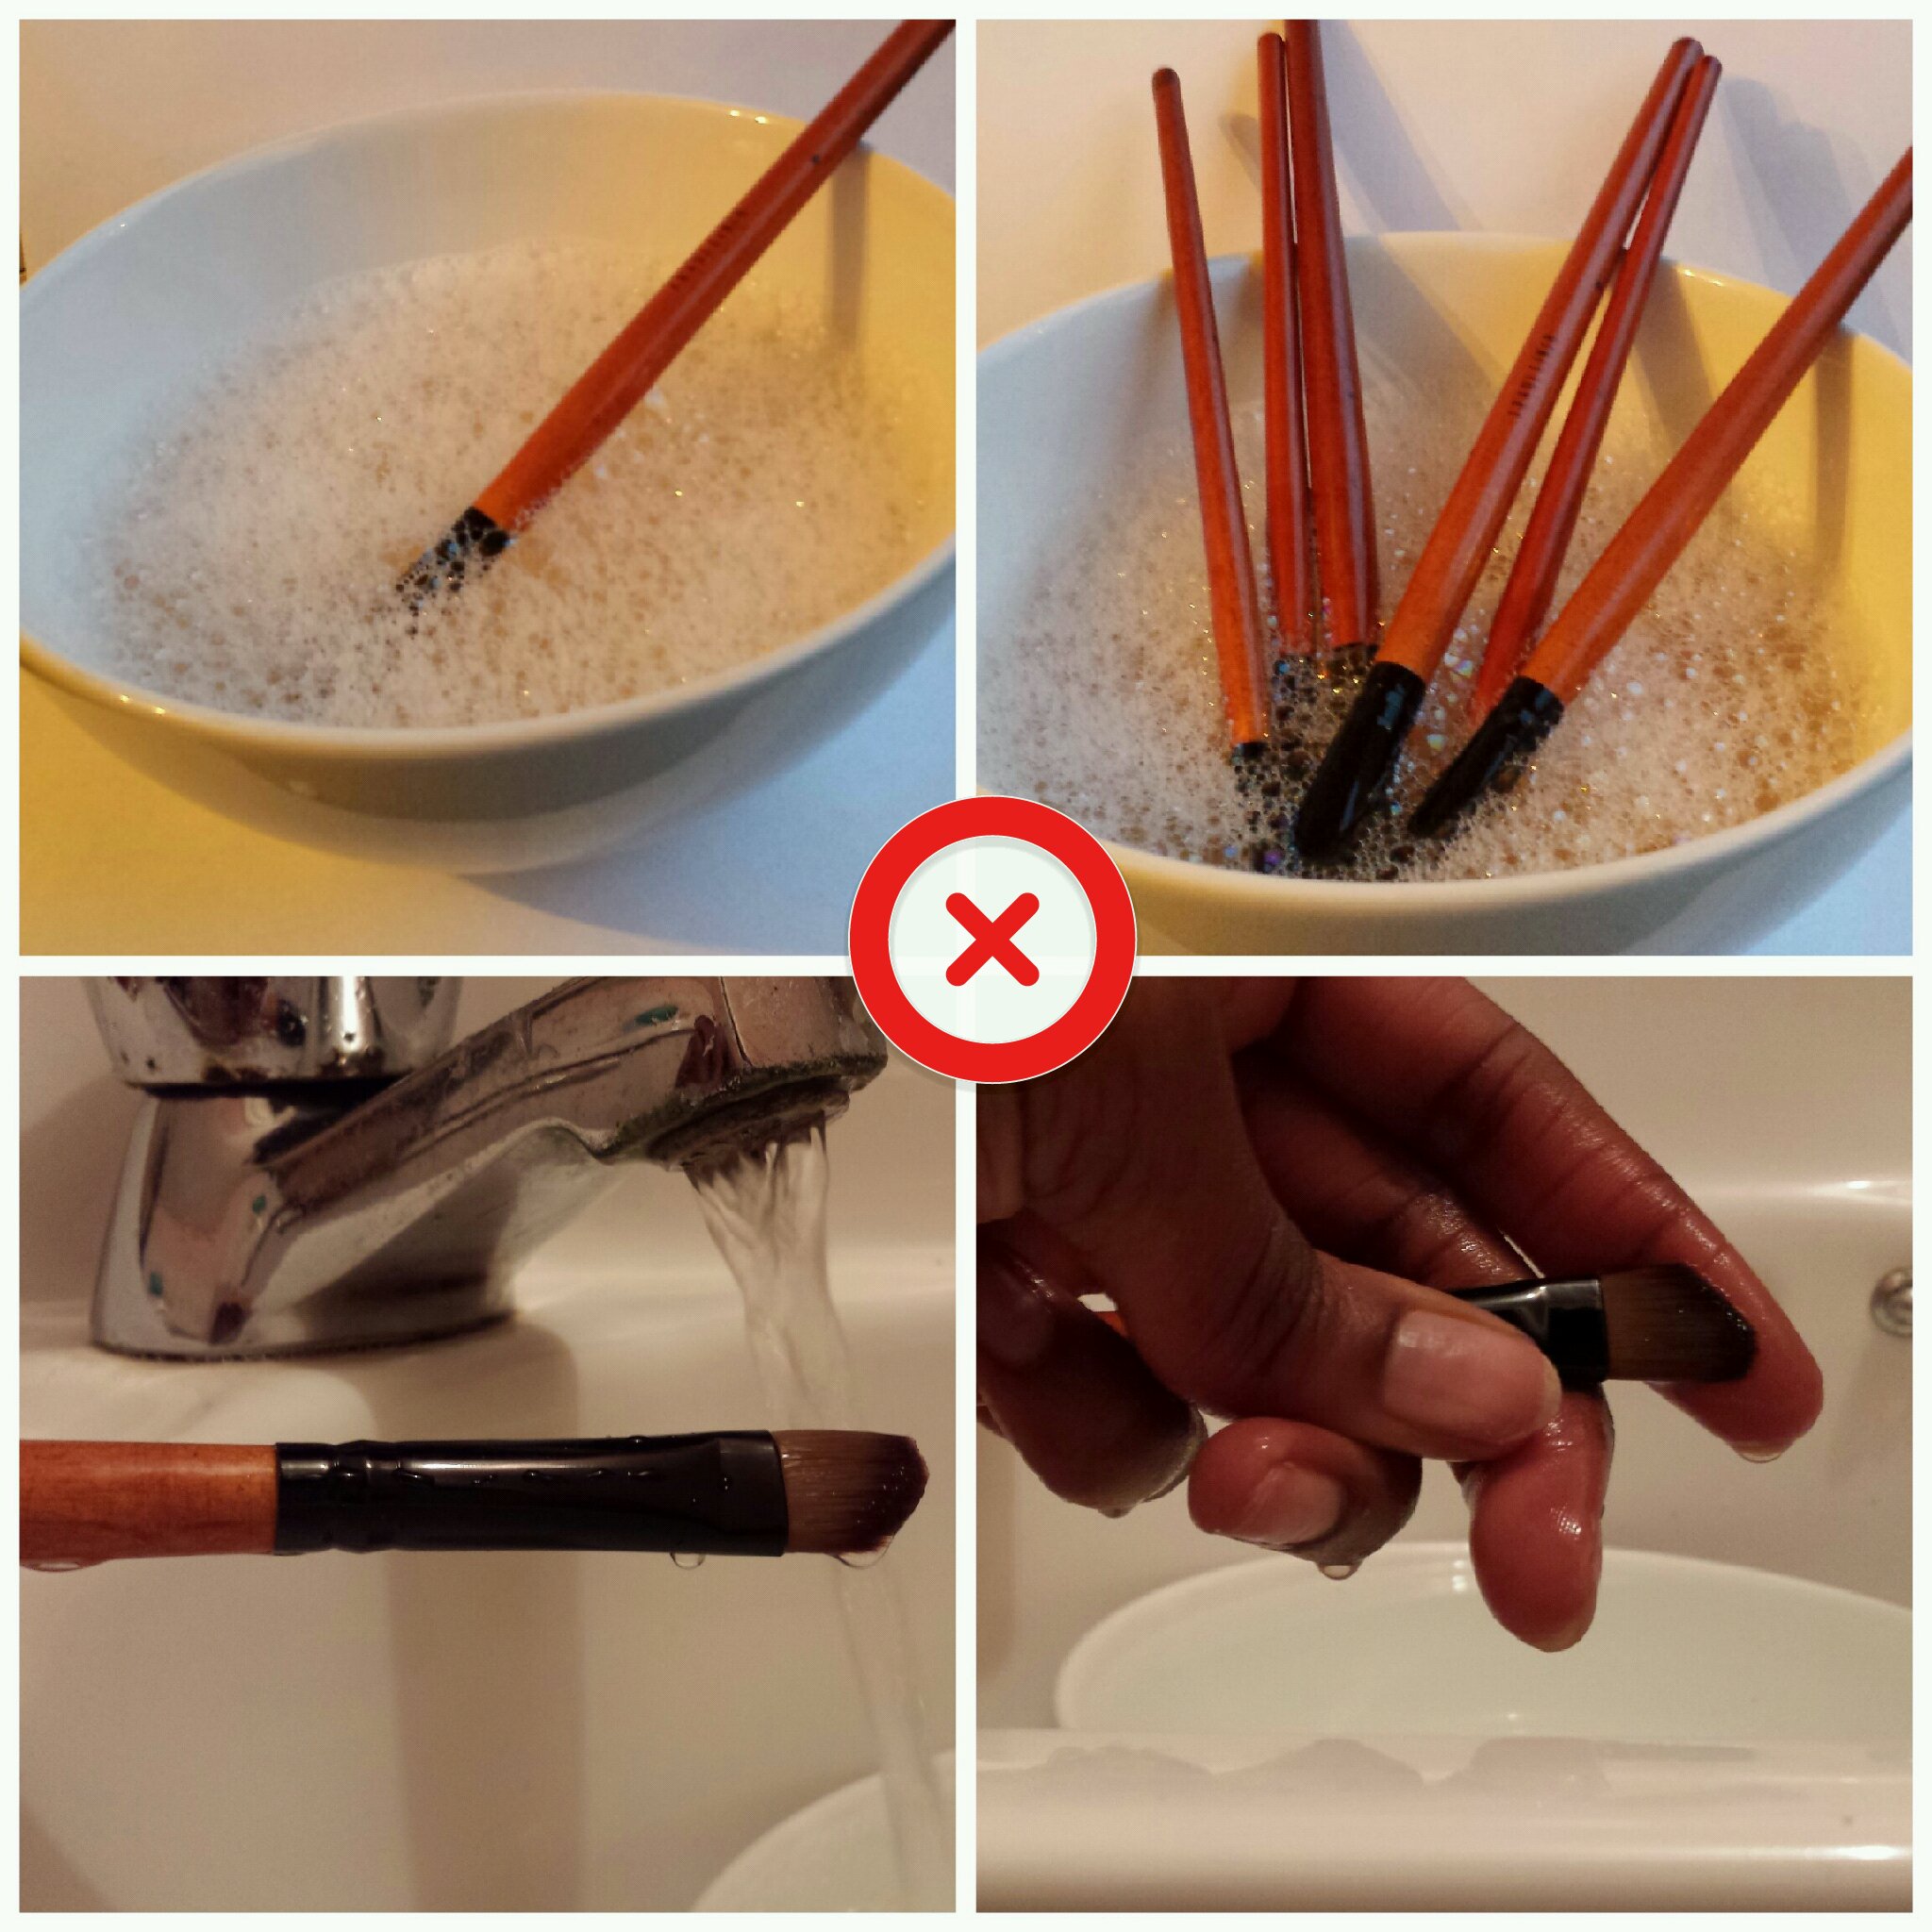
The above picture is what you should avoid doing. You should avoid immersing the head of your makeup brushes into water – pretty sure Bobbi Brown would back me up on that. Since the hairs on the makeup brushes are glued to the base, even the most expensive brushes will come apart if you do this so you should really avoid soaking your makeup brushes into water.

So how do you clean your makeup brushes then?

how to clean makeup brushes

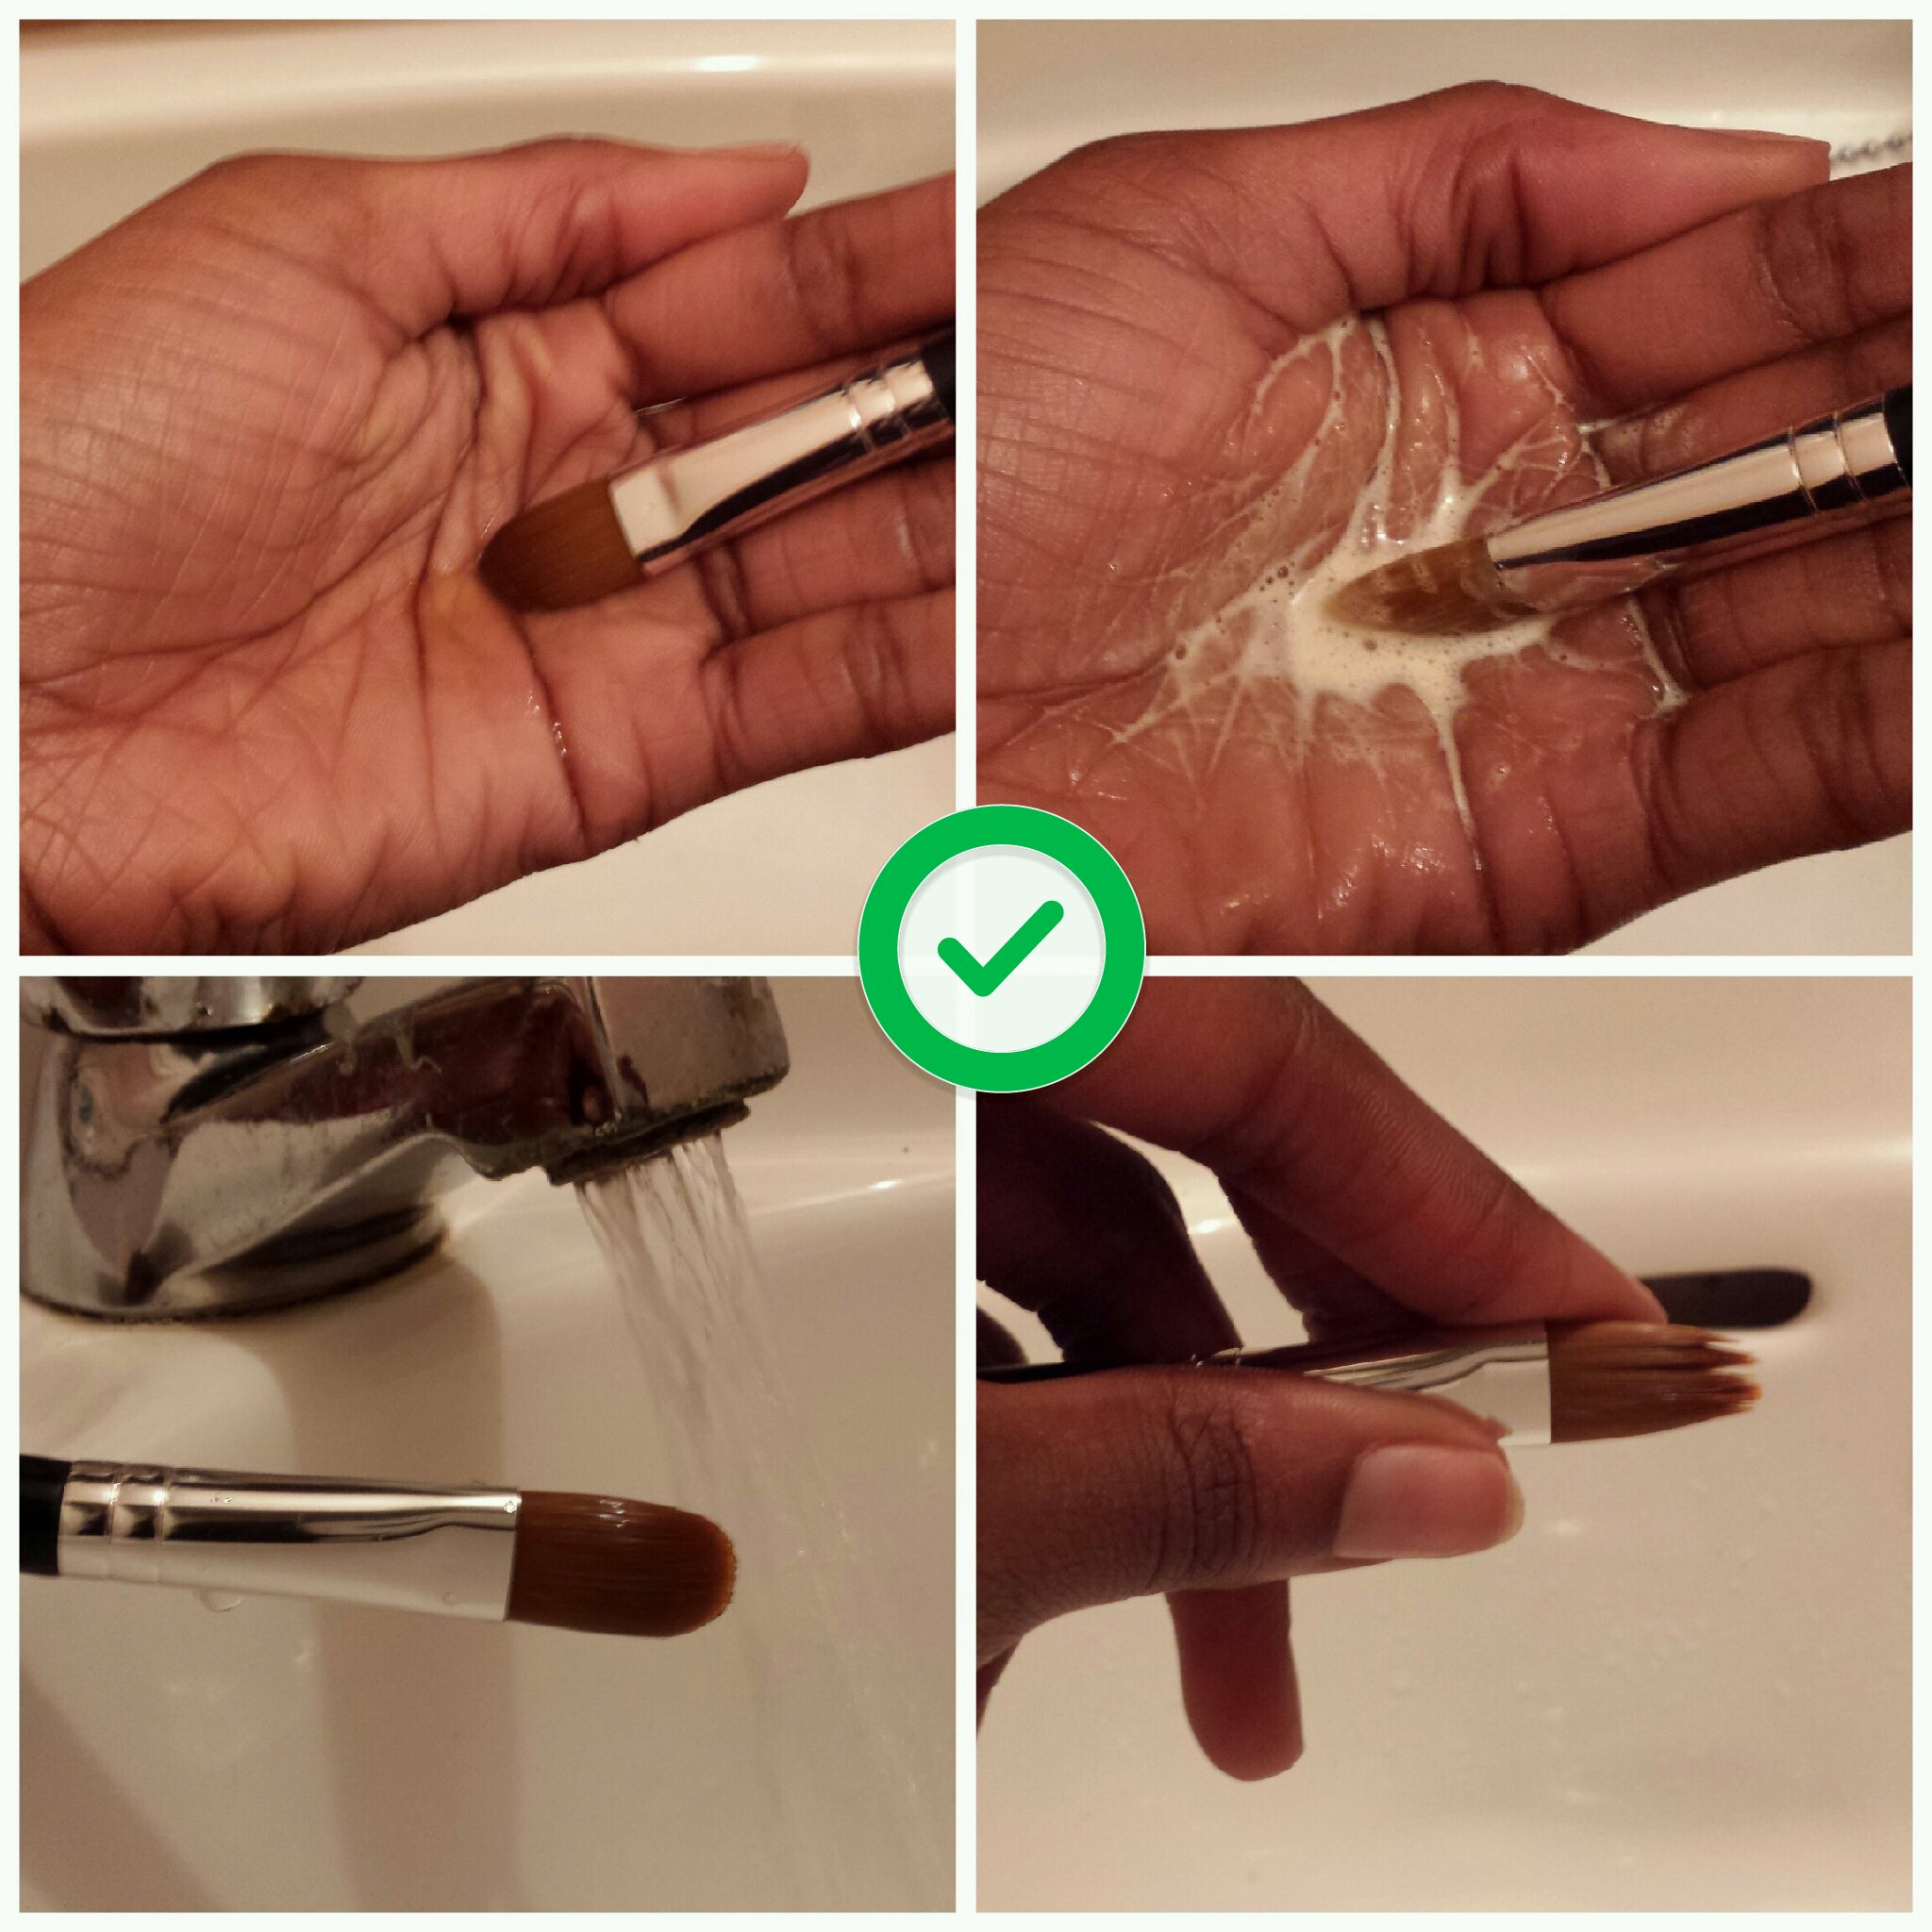
  1. Drop  a very gentle non-alcoholic soap (preferably baby shampoo) into the palm of your hand
  2. Swirl the bristles of your makeup brush around your palm after having wet the brush.
  3. Once covered in soap, rinse thoroughly until all the soap residue is gone.
  4. Squeeze out any excess moisture out of the bristles.
  5. To finish up, reshape the brush head with your fingers.

Drying Station: Let your makeup brushes dry flat and hanging off the edge of a counter so the bristles stay into perfect shape.

Note: When you’re drying your makeup brushes do NOT dry them in an upright position, or else the water settles into the glue which holds the bristles together at the base of each brush.

A deep cleaning of your makeup brushes is recommended between once a week or once a month- A bit of a stretch I know, but if you use your brushed regularly then once every 3 weeks. If you don’t use them as often, then you’re not required to wash them as often.

If once a month is far too long for you (or if you just want to be super hygienic), you can give your makeup brushes a quick clean cleaning in between deep washes.

For a quick clean just follow  the steps below:

how to clean makeup brushes

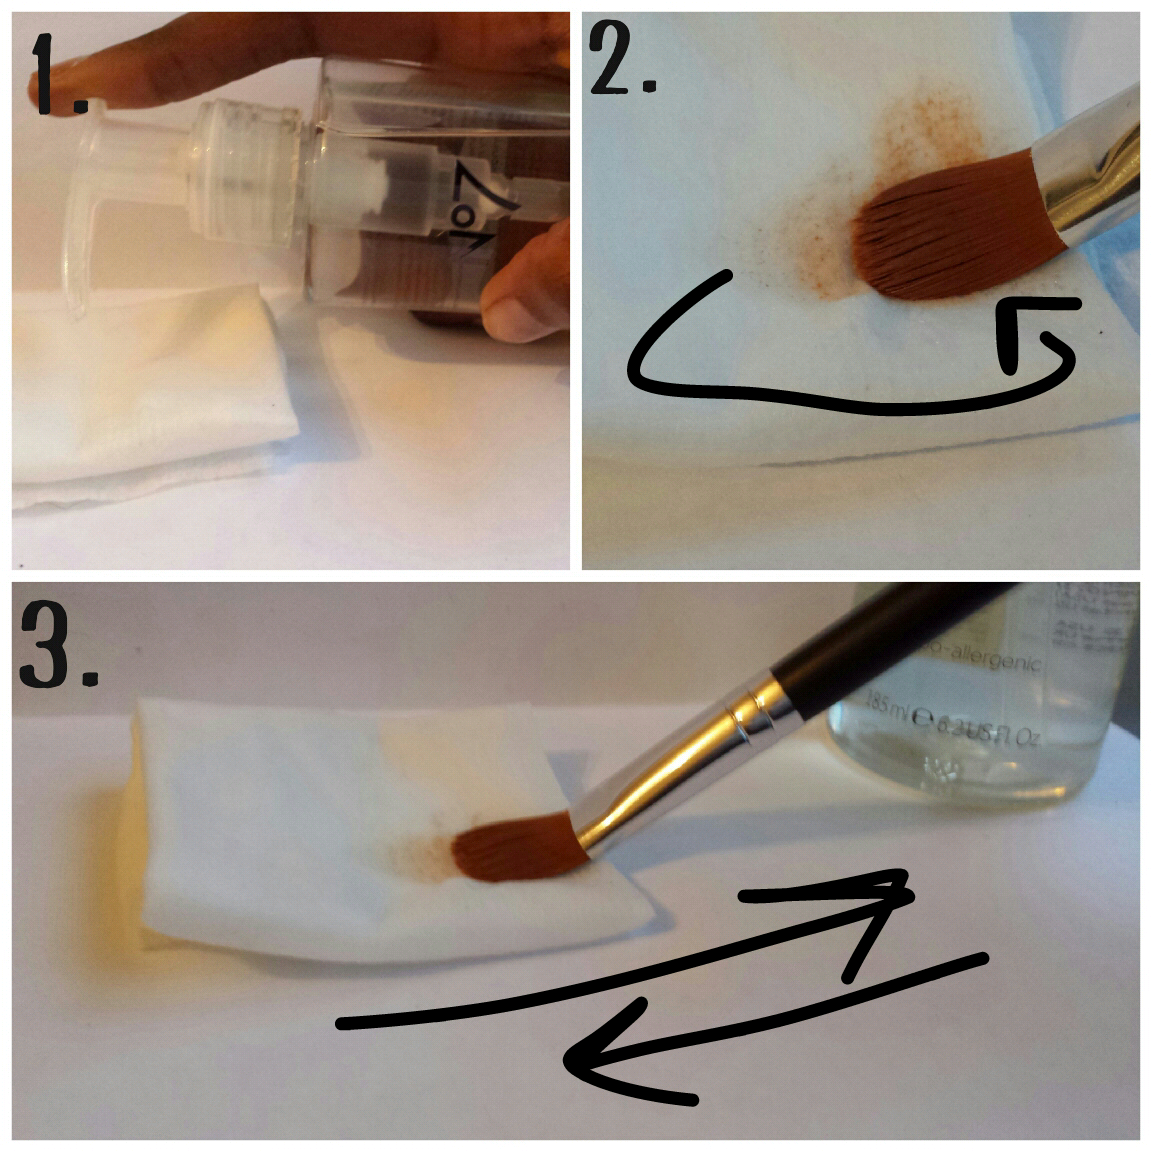
  1. 1. Spray a makeup brush cleaner on tissue
  2. 2. Swipe it around and add a few more spritz
  3. 3. Swipe it up and fourth until all the residues are removed

I’d be lying if I said I did this every time I finished using my brushes, but it’s something I do immediately if my sister used my makeup brush because she forgot hers. Other than that a good clean every 2 weeks just about does it for me!

Hope you’ll make use of this quick lesson, feel free to leave comments below!

Don’t forget to subscribe to Enhance What’s Yours 

Twitter     Facebook     Instagram

Related Posts

  • 30
    Photo credit Yesterday, I decided that a bit of pampering was in order. I put on some relaxing music and started off by cleansing and exfoliating my face and then, I went on to steam it. This was followed by a not so pampering experience of peeling  pore strips off my whole…
    Tags: enhance, what's, quick, brush, enhancewhatsyours.com
Posted on September 30, 2013

How to have perfect eyebrows

brows/ eyebrows/ Eyes/ How To

how to have perfect eyebrows

Today, Bellefbeauty.com has another tutorial for you, and of course it would have to be about eyebrows, because anyone who knows me would know that I’m eyebrow crazy, to me,  it’s probably one of the fastest (and easiest) ways to Enhance What’s Yours (not to mention how perfect eyebrows just lift your face!)

 So how can you have perfect eyebrows? It’s really simple, and as you can see, you really don’t need that many tools (so if you dare to leave your house without your eyebrows done, this is perfect for when you’re on the go!)

Without further ado, here are the steps for having perfect eyebrows:

eyeBROW-SHAPED-PERFECTLY

  1. Pluck out any unwanted hair – it will only get in the way!
  2. Comb out your eyebrows
  3.  Using an eyebrow pencil, outline your eyebrows to the shape that you want it to have.
  4.  Use an eyebrow powder that complements you (avoid using black alone even if you have dark hair)
  5. Fill in your brows using a brow brush
  6. Get a concealer
  7. Conceal above and below your brow using a concealer brush to perfect your brows and ensure that they are perfectly shaped
  8. Add a highlighter under your arch
  9. Voila! The complete look with some mascara!

Note: If you have stubborn brows, finish up with eyebrow gel- this will set your eyebrows and make sure your hairs are not flying around the place!

I know these eye brows are no Cara Delevingne (it wouldn’t be right to talk about eye brows and not give her a mention!) but you have to remember not everyone can have the same eyebrow shape.

If you’re unsure of what shape your eyebrows should have, check out my first post on perfect eyebrows.

Are you big into brows like myself, if so then how do you normally do your brows? 

Don’t forget to subscribe to Enhance What’s Yours 

Twitter   Facebook   Instagram

how to have perfect eyebrows

Posted on September 20, 2013

Purple Smokey Eye Tutorial

Eyes/ How To/ tutorial

    smokey eyes

You have no idea how much hassle I had to go through to finally get this post up, from drafts magically disappearing to WordPress not allowing me to access my site! But the important thing is,I’m here now right?

So first things first, among many other goodies I got at The Ultimate Girls Day Out, the Rimmel Traffic Stopping Shadow was one of them so today  Bellefbeauty is finally going to show you a purple smokey eye tutorial with the Rimmel Traffic Stopping Shadow palette

smokey eyes steps

As you can see the colors look quite pigmented here, but I found that it wasn’t the case when they were applied onto my eyes (not impressed) , especially since I couldn’t wait to use the darkest shade of purple!

The palette also contains a little eye shadow applicator (I normally wouldn’t go near these for a smokey eye look because they key to getting a really strong smokey look is blend blend blend!)

To my surprise this worked out quite nicely here and I only actually used one other brush to achieve the smokey look below, so enough with the chit chat and check out the steps Bellefbeauty followed:

smokey eyes  smokey eye

Step 1: After applying an eye primer, start with the lightest shade of purple all over your eye lid as a base (if it’s not perfect, don’t worry because it’s only going to be blended anyways!)

Step 2: I know you can’t see it very clearly here but for this step I used the darkest purple on the crease and outer corner of the eyes to the shape that I wanted my smokey eyes to have (again, doesn’t have to be perfect just make sure its right below the brow bone this way we’ll have room to blend upwards!)

Step 3:  Apply the lightest shade of purple to the bottom lash line .

Step 4: Use a blending brush to blend the colors on the outer corner of your eyes in an upwards direction first and the slowly build your way to the center. Then using the same brush blend the colors on your bottom lash line.

Step 5: Once you’re happy with the smokey effect you can add eye liner on your lower lash line and upper lash line (I did both and added a bit of a flick)

Step 6: One this is done, add a good few coats of mascara (when it comes to smokey eyes, the bigger your lashes  the better!) of course you can add false lashes if you want them to be more dramatic, but I’m not a fan of them so I just like to stick to really good mascara, (I used lash domination here)

Step 7: Add some highlighter to each tear duct so that your eyes will pop out (in a good way) and also put some highlighter on your brow bone so the arch of your eyebrow will appear higher (oh la la….)

And there you go, 7 easy-steps to achieve this purple smokey eye look!

smokey eyessmokey eyes

I hope you’ve found this  smokey eye tutorial useful, feel free to leave your comments below!

Don’t forget to subscribe to Enhance What’s Yours to get more tutorials

straight to your phone!

Twitter   Facebook   Instagram

smokey eyes

Posted on August 12, 2013

How to have naturally long eye lashes

Eyes/ How To/ Natural beauty

how to have naturally long eye lashes

I must admit that I am now ready to share one of my best kept secrets with you (of course I needed time to test my theory etc so do forgive me for keeping it for so long!) and what’s even better is that you can start to test this theory yourself starting tonight! That’s right, you can try it tonight so prepare yourselves ladies because in this very short article you’re going to learn how to have naturally long eyelashes…

What you need:

Cotton bud

Olive oil

What to do:

Every night before I go to bed, I take a cotton bud and dip it into a bit of olive oil then gently rub it on my eyelashes, after a couple of weeks I started to notice that my eyelashes started to get longer, even to a stage where I didn’t need  to wear mascara on a regular basis to make them stand out (of course I still wear it to add to the effect so now my eyelashes look even longer with mascara)

It’s that simple!

Generally olive oil has a nourishing affect when used on our skin or our hair, hence why it is often used for home made hair growth treatments or home made facials so it’s beyond me how we often forget to treat our eyelashes! At the end of the day it is hair, so no wonder it has the same effect!

Precaution:

You may wake up with puffy eyes if you put on too much olive oil, so make sure you avoid putting loads on your poor eyelashes! (we’re trying to better the situation, not make it worse)

I’m excited to hear if any of you try this at home! It’s worth a try, after all, what’s the worse that could happen?

P.S. Don’t forget to subscribe to this blog to be in a chance to take part of my free giveaway! If you’re using any products to grow your eyelashes, feel free to leave any comments below 🙂

Twitter   Facebook   Instagram

Posted on August 8, 2013

How to make a lip scrub

D.I.Y/ How To/ lips/ Natural beauty

diy lip scrub

I don’t think I stand alone when I say that there’s nothing better than a good D.I.Y that takes no longer than a minute to put together! So for this weeks second post, I thought I’d show you all how to make a lip scrub at home!

Why should you use a lip scrub?

A lip scrub is one of the things that you could use to exfoliate your lips! If you’d like, you could simply brush your lips with a tooth brush after brushing your teeth, but if you’d like to make your beauty routine a bit interesting, you could go on ahead and use this recipe to make your own lip scrub at home!

What you need to make a lip scrub:

1. 1 tbs  Olive oil

2. 1 tbs Honey

3. 2-3 tbs Sugar

4. A clean bowl and spoon

5. Damp face towel

6. Empty jar (optional)

7. Your beautiful lips!

How to put the lip scrub together:

1. Put the Olive oil, honey and sugar into a bowl.

2. Mix the ingredients until you get a pasty mixture as pictured below

how-to-make-a-lip-scrub

3. Using your index finger rub some of the mixture onto your lips for about 30 seconds.

You should already feel a difference at this stage!

4. Using your towel, wipe your lips and repeat the process this time rubbing it for a lot longer (1 -2 mins)

5. Again, use your towel to remove the lip scrub and voila!

6. If you’re a bit of a hoarder, you could put the rest of the lip scrub into an empty jar but make sure you get the full use of it, if not, it will only get hard and go to waste.

Note: Regularly exfoliating your lips with a lip scrub helps remove old and dead skin cells on your lips so over time your lips will become more moist and naturally plump

(Vote no to dry and chapped lips!)

P.S. Don’t forget to subscribe to this blog to be in a chance to take part of my free giveaway! Feel free to leave any comments below 🙂

Twitter   Facebook   Instagram

Posted on June 26, 2013

How to find the right foundation

How To

the right foundation

Searching for the right foundation may prove to be a rather stressful experience and more often than not, the foundation people do end up with aren’t completely satisfactory and in some cases women just settle for something they think  ‘will do’ not knowing that there are better options out there for them.

Luckily for you, you don’t have to be as unfortunate as others! you get to have your foundation especially picked out to suit your needs.
How?
With the help of Poppy, a personalised foundation search tool used to find the perfect foundation for your skin exclusively! I know they say ‘when something is too good to be true it’s probably not’,well I kid you not , this time around  it’s more than just true, it’s a dream come true! visit www.beauty.ps and see for yourself.
On the first page of this website a cute pink button that reads ‘let’s begin’ will tempt you to click it.
Once you finally give in to this temptation (which you will) , you will be asked to enter your name and email address before the magic begins…..
the right foundation
As you can see, Poppy welcomes you in a rather sophisticated manner, she will then ask you a series of questions regarding your skin tones, your skin type and what kind of coverage you’re looking for.
In the end, a summary of your details will be shown to you. This is needed in order to maximize Poppy‘s search (as well as confirming the info you entered, you could always go back if you have to change something) 
By letting the expert know which foundations you’ve already tried and by rating these foundations, Poppy will be in a better position to pick out the right foundation!
After completing these simple steps, you will then be given the names of the recommended foundations for you, here’s a look at mine:
the right foundation
These were the lucky three that made it to the finish line for me, I tried a sample of them and found each to be great,  but the gold medal would definitely have to go to Laura Mercier. It is by far my favorite!
Now with the debs coming up, this would be a great tool to use to help you achieve that flawless Kim Kardashian  finish! Introduce yourself to Poppy and be the belle of the ball!
For those of you who will try this out, feel free to tweet me your results, would love to know how you get on!
Thanks for reading this post.

Twitter    Facebook     Instagram

Back to top
%d bloggers like this: